Welcome to adobo-down-under!

Musings. Family. Food. Stories. Cooking. Recipes. Eating. A recipe journal. From simple Filipino dishes to challenging recipes and exciting gastronomical failures. This is for my girls to look back on for comfort, memories, laughs, love and lots of food!

Tuesday, December 17, 2013

Red velvet cupcakes


December is a busy and expensive month for us.  We have a birthday, an anniversary and then Christmas.  The gift giving can get really overwhelming if we don't stop ourselves from the purchases.  In past posts, I always mention that Christmas shopping for me, has gone from overly organised (back in my single days), to last minute shopper.  Before, I would have gifts for everyone months before December and all I need to do in the last few days leading up to Christmas will be to wrap them. These days, hubby (as he is constantly online), he purchases most of the girls' presents ahead.  He's good like that.  He's reliable that way and I am so grateful.  Really. A few days ago, I just started wrapping them.  And I'm really impressed. Now all that's left now is to get Santa's presents.


Now that part, he leaves to me.  I try to be really sneaky and at the same time realistic every year.  But just last year, lists to Santa has extended into the technology realm - you know, the latest iPod or some other overly expansive gadget.  The girls were really cheeky.  "If mum or dad won't buy us, they maybe Santa can get this for us?"    Well, for the younger girls at least.


I don't know about you, but I'm the more conventional mom when it comes to toys.  I mostly get board games instead of apps, crossword and word search puzzles and books instead of the latest Wii game.  Last year, just to get into the apps world, I got them the Draw Something board game.  Yeah.  I'm not saying I don't play game apps or have the latest from iTunes, but I still do believe in the basic of playing - interaction (face-face) and having a good time.  

 
The younger girls at 10 years old are sort of in between that age when magic is becoming reality.  Their friends at school don't believe in Santa and of course, they get into that stage where what is said in the classroom or in the playground, just might have some truth vs what mum/dad said.   As much as possible, I'd still like to play that game while they're still young. I think believing in the idea of Santa creates a sense of wonder and awe each Christmas morning, and I love watching their reaction.  The open-mouth-surprise and smiles are priceless.  That's the part I love.  So don't judge me!


This year, Santa's elves at the North Pole still don't make Apple products so that's out of the list for now.  But some creative stencil stamps, new board games and a magic juggling ball might just under the tree next week.


Now Christmas is my favourite time of the year.  In Australia, when it's the middle of the summer makes me love it even more.  Summer fruits, beautiful colours all round, days at the beach, endless blue skies, warm breeze, Christmas decorations, Carols, and just the deep sense and feeling of delight in sharing and giving. 

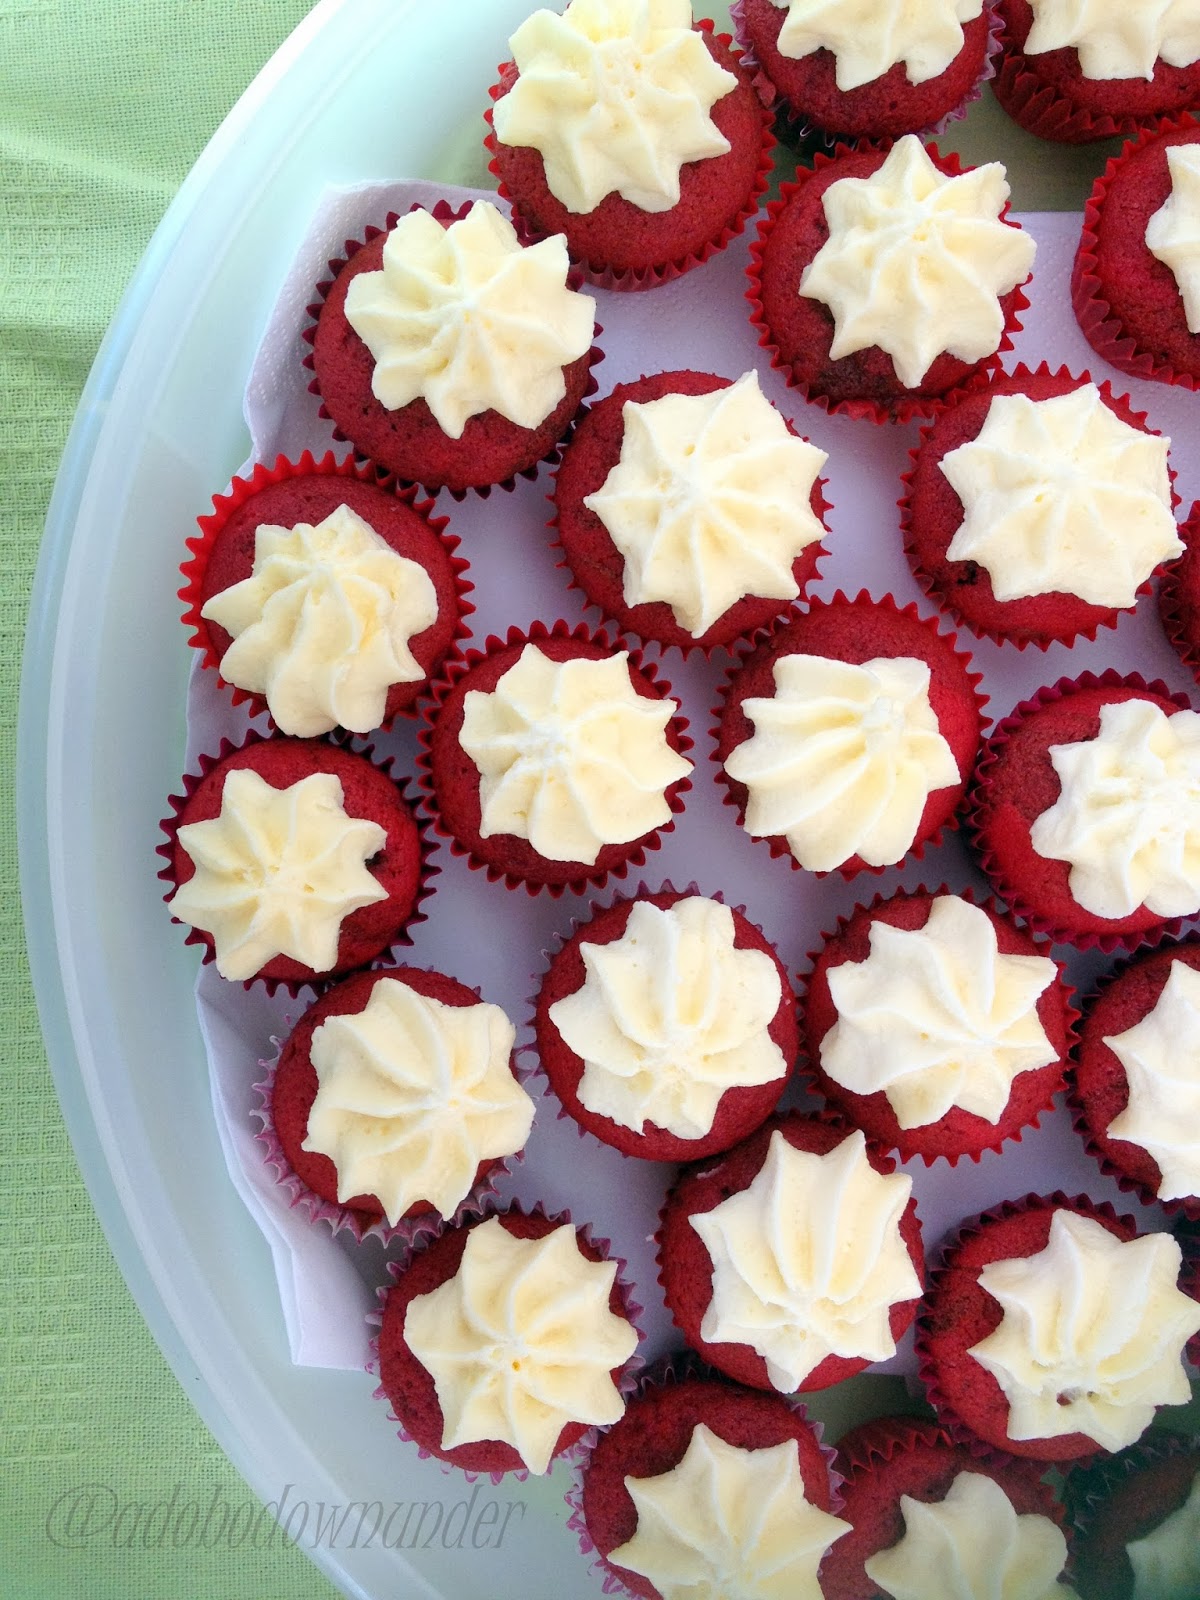
Each year since two years ago, I started making homemade food gifts to friends, work colleagues, teachers and neighbours.  I love the idea of getting busy weeks ahead planning what it will be, shopping for ingredients and making them in layers (a day at at a time).  And these red velvet cupcakes are always a hit with anyone who receives them.  Why not?  They're red and so Christmassy!  Don't you think so?


This recipe is adapted from the Joy of Baking.  I have made them so many times and have varied the brands of ingredients with the same result.  I have doubled Stephanie's recipe to make 24+ half-cup sized cupcakes.

Ingredients for cupcakes

2 and 1/2 cup (250 grams) sifted plain flour

1/2 teaspoon baking powder

1/2 teaspoon salt

2 tablespoons cocoa powder

1/2 cup (120 grams) unsalted butter, softened

1 and 1/2 cups (300 grams) caster (white granulated) sugar

2 large eggs (about 60-65g each)

1 teaspoon vanilla extract

1 cup (250 ml) buttermilk*

2 tablespoons liquid red food colouring

1 teaspoon bi-carbonate of soda (baking soda)

1 teaspoon white vinegar


Method
 
Preheat the oven to 175*C.

Line two 12-half cup capacity cupcake tins with cupcake liners.

In a large bowl, sift together flour, baking powder, salt and cocoa powder.  Set aside.

In a measuring jug, mix buttermilk and food colouring until incorporated. Set aside.

In the bowl of your stand mixer, cream together the butter and sugar until light and fluffy.

Add the eggs one at a time, beating after each addition.

Continue beating and add the vanilla extract.

While the mixer is on low, add about 1/3 of the flour mixture, then the buttermilk mixture into the bowl. Add the flour and buttermilk alternating in three batches and mix until the batter is consistent and there are not more flour lumps.  Scrape down the sides of the bowl when necessary. Put the mixer on stop/pause.

In a small cup, combine the bi-carbonate soda and vinegar.  Allow the mixture to bubble.

Turn the mixer back on to low and quickly add the bi-carb soda-vinegar mixture and continue to mix for 10 seconds.

Scoop a tablespoon in each cupcake hole or at least a third full.

Bake in the preheated oven for 20-25 minutes, or until a skewere inserted into the cupcake comes out clean.

Place on cooling racks and leave to cool.


Make the Cream Cheese Frosting

1 box (250 gram) cream cheese, softened

125 grams salted butter

1 teaspoon vanilla extract

1/2 cup (50 grams) pure icing (confectioner's) sugar


In the bowl of a stand mixer, beat the cream cheese and butter until light, fluffy and soft.

Add the icing sugar a tablespoon at a time and continue mixing.

Add the vanilla extra and mix until incorporate.

Using a spatula, spoon and spread on top of cupcakes or spoon into a piping bag with a star tip and pipe onto cupcakes.


 Tips and tricks:

* To soften butter, take it out of the fridge to thaw for at least an hour or more (depending on the weather and season);

* Softened butter means its pliable.  When you pinch the butter, it creates a small dent.  Softened butter does not mean soft to the point of melting.  

* When preparing your butter and cream cheese, it helps in the mixing/creaming when you cut them into cubes. 

* As soon as you add the vinegar-baking soda, I always count 10 seconds to the dot then turn off the mixer and just fold the batter gently with a spatula.

* Don't overfill your cupcake tins.  If necessary, which is the case with me, I usually prepare another cupcake tin with liners for the excess.  

* When creaming the frosting, make sure all ingredients are at room temperature. When one ingredient is even slightly cooler, it can cost the frosting to look curdled - meaning the butter becomes solid again. 

* For buttermilk substitute, you can make your own sour milk which is 1 cup milk with 1 tablespoon lemon or white vinegar.  Let the mixture sit for 5 minutes until the milk has curdled or thickened.  I

* Plain natural yogurt can also be a substitute for buttermilk.  With the same amount in the ingredients, prepare  your yoghurt by mixing it with a teaspoon to take out the lumps. (Joy the Baker has some variations on the buttermilk substitution you might want to try.)


And so it's only 8 days till Christmas!  Are you ready yet? 

Is everyone's gift ticked on the list? 

Have you planned your Christmas menu?

And.... do you play the Santa role too?


Tuesday, November 26, 2013

Mixed vegetable soba noodles salad with peanut sauce


Traditional Filipino cuisine does not have a lot of fresh vegetable salad dishes in its repertoire.  Most vegetables are cooked in soups or stews, some are steamed and served with a side of dip or some form of chutney or relish.  It's quite surprising because even with the warm tropical climate, cooked vegetables are almost always the only option in most homes across the island.  The reason is that while there are available salad vegetable varieties, they are pricey as they come from the upper north or the south where the climates are cooler.   

Growing up, I can't remember salads serve on the dinner table except for the usual tomato-onion-green mango that comes with a good barbeque, classic salads are only to be had when dining out in restaurants.  


Living in Australia has opened a lot of fresh green doors for me.  My kids are now accustomed to fresh salad and veggies on the table, lettuce in their sandwiches, cucumber slices in their lunch box... the works.  Especially as the season becomes warmer, fresh and cold salads are the best way to serve the day's healthy portions. 


Now the real hero here is the dressing, aka peanut sauce.  The soba noodles add the healthy protein touch.  This recipe is adapted from Pallavi Gupta through Honest Cooking.

To  make this salad just add vegetables which you are keen to eat fresh and raw - cucumbers, lettuce leaves, cherry tomators, grated carrots, slices of capsicum. You can just play around with the quantities.   But for this salad of 4 serves, I used:


Ingredients:

60 grams organic soba Hakubakku brand, cooked according to packet instructions then drained through cold running water.
(I used 2 bundles from the 90g pack)

half capsicum, julienned

6 pieces cherry tomatoes, sliced in two

1 cucumber, sliced

1 carrot, julienned

1 brocolli, stems removed

2 stalks of spring onions, sliced


For the sauce:

1/3 cup smooth peanut butter

1 red chilli, finely diced

1 clove garlic, finely diced

2 tablespoons sweet chilli sauce

2 tablespoons soy sauce

60 ml warm water (or less)

Combine the peanut butter, chilli, garlic, sweet chilli sauce and soy sauce in a bowl and whisk together.  Add the warm water a tablespoon at a time and continue whisking until you get the desired consistency of the sauce.

 Place the cold soba noodles in a large bowl, add the vegetables and toss together.  Drizzle the peanut sauce when serving.

Tips and tips

* You can add as many or as few raw/fresh vegetables in this salad.  Just make sure you slice them thinly (julienned).

* You can make the sauce as thick or as thin as you like, just add (or don't add) warm water as you prefer.  

* I made this a day ahead and it became think in the fridge.  I diluted it with a little bit of warm water and added a few more teaspoons of sweet chilli sauce to suit my taste.  


Perfect for the warm spring weather for a weekday lunch, entree or to accompany hot BBQ on a weekend.

Enjoy!


Monday, November 18, 2013

Coconut macaroons - Filipino style


There are a few things that make the Filipino home.  Besides the rice cooker and on ready supply of soy sauce, rice and fish sauce, there are the usual things around the home that adds to the Filipino touch. 


There's the tabo in the bathroom, a framed art work of the Last Supper, wooden spoon and fork tandem on the wall and of course the magic mic - your ticket to endless hours of at home videoke. Filipinos do love to sing.  Well majority of us do.  Never mind if one can't hit the notes, karaoke at home is one of the Filipino's fave past time.


Now one of the traits that standout in the Filipino is resilience. We have had bouts with typhoons every year and corruption in the government, and all sorts of negativity that makes it a nation unattractive to some if  not a few.  With the recent calamity that wreaked devastation across the Southern part of the Leyte in the Philippines, properties and lives lost, Filipinos rise to the occasion.  I can't begin to write about how, seeing the horrific footages in the news both local and abroad has made me feel.  While our families and friends are safe away from the devastation, it is my home country and I felt so helpless that I'm so far away when I could be helping out there, on the ground.  I stopped using social media for awhile and have stopped watching the news.  I thought to give it a rest - posting food photos as a bit of respect for those who are going hungy in the typhoon savaged towns.  And while away, have organised a little fundraising donation drive in our little circle of family and friends.  Last weekend, we celebrated my mom's 75th birthday and asked guests to bring a can or two from their pantry to donate.  Sometimes we take it for granted that we have a full pantry with stuff we don't need and it put things in perspective.  Guests brought in more that just a can or two, they even shopped new items and the kids collectively donated lollies put in small ziplock bags with a message - "to the children affected by the typhoon, we hope this makes you smile."  I always say, no help is too small.  We delivered our donations this weekend through a Filipino-Australian community with their 48hr Response led and coordinated by Michelle Baltazar.  Thay have established a website Help after Haiyan and partnered with World Vision Australia to assist with the appeal.

While the devastation is horrific and rebuilding will be massive and will take years, the relief and help from all over the world is overwhelming!  It's heart warming!  It is touching!  So in behalf of the Filipino people, I'd like to say thanks!  Maraming salamat!  


Now back to blogging with this month's theme at the Sweet Adventures Blog Hop camp hosted this month by Nic Cooks with the theme "Say Cheese!" If you haven't read about Nic and her cooking adventures, you need to know that she loves cooking with cheese!  Why she makes her own cheese - check out her Cheesapalooza adventures!  And check out her Goats Curd Ice Cream for this month's SABH post!


So I thought I'd share the Filipinos love for cheddar cheese here.  I thought to make some Queso (cheese)  Ice Cream as its one of my fave store-bought from the Filipino shop, but time has failed me in between organising my mom's birthday party, family commitments, school, work, domesticity, yadda yadda yadda....   so instead, I am sharing a long forgotten post (in my drafts folder) for the a Filipino favourite cupcake - coconut macaroons.  Why it has cheese of course!  Which is supposed to be a secret ingredient, but I'm spilling it here anyway.


This recipe is adapted from Filipino Food Recipes. To make these coconut macaroons.

Ingredients:

2 cups dessicated coconut

1/2 cup (60g) plain flour

80g butter, softened

1 cup (200g) caster sugar

2 eggs

1 395g can condensed milk

1/2  cup grated tasty or cheddar cheese

1/2 teaspoon vanilla extract

 Method

Preheat oven to 180*C.

Line 2 cupcake trays (12 1/2-cup capacity) muffin tray or a 24 mini cupcake tray with liners.
In a bowl, mix together the flour and dessicated coconut with a spatula.  Set aside.

In a bowl on a standmixer, cream the butter and sugar together until light and creamy in texture.

Add the eggs one at a time and continue beating.

Add in the condensed milk and cheese and continue mixing. 

Add the dry ingredients (flour and dessicated coconut) and mix on slow speed until incorporated.

Spoon into prepared cupcake trays 2/3rds full,  and bake in the oven for 15-20 minutes or until golden.

Place in a cooling rack to cool for 10 minutes.


Tips and tricks:

*  You can add another 1/2 cup of grated cheese to the mixture like I do, as I like it really cheesy. This will not affect the texture of the macaroons.

* Do not overbake as they will be hard as a rock if you do.  When they're golden on the top, take them out of the oven and onto cooling racks.

 * These tastes even better the day after they're made.  They can keep at room temperature in an air tight container for a week.

* These are great as homemade gifts too!


Tuesday, November 05, 2013

In my kitchen - November

I am joining this month's series of In My Kitchen hosted by Celia of Fig Jam and Lime Cordial.  It's a welcome break from the cooking and baking challenges and hops that I join and always a fun and lovely way to meet other kitchen enthusiasts.  Thank you Celia for hosting and hopefullly, I can continue on to join the challenge from here on.  


In my kitchen this month...  are these lovely smoked olives I got from the markets.  They don't have a brand or a name but they are made by a family who knows about smoked foods.  They also have smoked salmon fillets and they were divine!  I caught them at the North Sydney markets one weekend.  Their claim - these are the best taking olives in the galaxy!  I couldn't agree more. 


In my kitchen... is this tiny box of Ceylon tea fresh from Sri Lanka from an office colleauge who recently did the off-the-beaten-track road trip from Sri Lanka to India.  Food gifts are the best, don't you think?


In my kitchen... is this handsome fast and furious juice extractor.  I got sucked into it while browsing through the TV channels and I'm loving it!  I have a glass or two of nutriblasts a day!  Have you seen this on TV?  Or maybe you already own one?


In my kitchen.... are these two new ingredients I got from this wholesale shop I discovered just recently Oriental and Continental Foods.    This vanilla extract was only $4 and the tahini sauce is $3.  I got so many more stuff but these are worthy of mention.  And oh, they also have more than a dozen varieties of sea salt flakes - from pink Himalayan to citrus infused flakes.  


In my kitchen... is this lovely French wire basket/tray I scored from the local Scouts car boot sale recently.  I do love a good bargain when I see one. 


In my kitchen.... are bunches of these kale.  Not grown but bought from weekend markets.  Kale has been making its way in our kitchen since we bought the Nutribullet.  Well, kale and lots of the other green good stuffs.


In my kitchen... is this kneading mat. Something I bought ages ago but never used.  But since I've been making empanadas lately, finally this mat has seen the light of day.  More use of this in the next months.


Monday, November 04, 2013

Barbecued pork belly cooked in capsicum paste


I love a good make ahead recipe.  Especially when it's something that can be used for grilled dishes (like my version of chermoula chicken)  and when it takes me outside of my (Filipino) comfort zone - where the usual marinades consists of soy sauce, vinegar and garlic.  This one caught my eye from the get-go - the small photo in the October 2013 issue of The Sydney Magazine of Mark Jensen's barbecued pork spare ribs was enough to leave me drooling and craving for this dish!  And when that happens, off to kitchen I go.

Red capsicums are a plenty at my local green grocer and they're cheap as! Although they came in different sizes.  But size and shape does not matter that this was on our table for a weenight dinner. It helps that I only work 3 days a week and Mondays and Tuesdays are quiet days to ponder and domesticate myself while the kids are at school and hubby at work. So I prepared the paste a day ahead.


Vibrant red!  They're so pretty!


Oh. The. Smell!  It was divine!!

Now the hero of this dish is the capsicum paste.   You make it a day ahead and it keeps in the fridge for up to 2 weeks (according to the recipe). 


Ingredients:

125g of red capsicum, washed

2 heads garlic

2-3 pieces red chillis

salt and pepper

2 tablespoons extra virgin olive oil


Method

 Preheat oven to 220*C.  

Place capsicums and garlic on a baking tray and roast for 20-30 minutes or until the capsicum skins have blackened.  

Place a rack and leave to cool.

Peel the garlic skins off and place the flesh in the food processor.

Peel and seed the capsicums and add to the food processor with the chillies, salt and pepper.

Process to a smooth paste.

Spoon into sterilised jars and top with olive oil.

Keep in the fridge until ready to use. 


Poured into a sterilised jar and topped with olive oil!


On the ready - to brush onto the pork pieces!


To make the barbecued pork ribs or belly:

1.5 kg of pork belly, sliced 1/2 inch thick strips

Generously rub on pork pieces and leave to marinade in a glass bowl, covered with cling wrap in the fridge - minimum 1 hour (or up to 4 hours)

Heat the BBQ grill or pan-grill and cook away.

Chop into small bite size pieces.

Enjoy with some coriander for garnish.  Serve with a slice of lemon or lime.  Best eaten with lots of rice.


Tips:

* In the recipe, Mark suggested to place the roasted capsicums in a plastic bag for 15-20 minutes.  I guess this makes the skins peel off easily.

* The recipe called for julienned ginger and chilli slices for garnish.


Monday, October 28, 2013

Chicken liver adobo (pate)


This week is another chicken dish, but one that drives close to home - it is an adobo dish.  And involves a favourite of mine - chicken livers.  It's not one though that I always make at home as I'm the only person who eats it.  When my parents were visiting last month, we made this as my father is just a huge fan as I am.  I guess being of the offal category, chicken livers take a bit of effort to like, to love even.  Some get squeamish at the thought, and it was one of the reasons why I never thought of sharing the recipe in the blog.   It is quite an effort to make the photos attractive, so I have discounted the photos from the preparation to the cooking.  Even the cooked dish was not likeable no matter what angle.  So I thought I'd reinvent it a bit and make it pretty.


And I'm sharing the recipe as guest post at Debra's blog The Saffron Girl.


I first met (virtually) Debra through Instragram, following each other's food creations and me drooling at her travel photos.  I now stalk her on Facebook , Pinterest and Twitter. Hahaha!  Debra posts a lot of paleo and gluten-free dishes and I admire the passion she puts into each dish - she does a lot of research and tweaking and reinventing to adapt to her readers. 


I was first drawn to Debra's blog for the Spanish dishes which she makes as ode to her roots.  Why am I drawn to Spanish dishes?  Well, its because (and I have mentioned this in many many posts), it is my dream to travel to Spain and eat and drink and eat and drink and ......  Where did this come from?  I supposed from the history of the Philippines where I grew up and probably because I believe I may be a Spanish senorita in my previous life.  But that's just me. 


When Debra first asked if I'm interested to do a guest post, I was filled with excitement and nervous fear.  As it's something I have never done before, it was kind of daunting like sitting for a finals exam.  It took awhile for this to materialise, but it was actually fun and every bit worth it.


So, hop on down to The Saffron Girl and have a taste of this classic Filipino dish.  Reinvented and prepared for Debra's readers.


Monday, October 21, 2013

Chicken rollatini with ricotta and spinach


It's 65 days more till Christmas!  A little bit more than two months to the silly season!  Shopping malls are already filled with trimmings and marketing ploy to make us stay at the malls longer and shop till we drop. 


Well that ain't working with me.  You see, I hate shopping.  I hate shopping malls. I hate shopping malls during the Christmas rush especially. 


Usually, if there's really a need to go in there, I'd dash in and out in less than hour.  


Not that I don't shop for clothes and shoes.  I do.  It's just that when I'm out shopping, I pretty much know what I want and get it.  Straight up.  


But with food.  Food shopping?  I'm more patient and take time.  Savouring the smells of seasonal fruits and fresh veggies, browsing at the seafood on offer and cuts of meat for the day.  I usually shop at the markets and my favourite Asian butcher and fish monger locally.  And that's my happy place.   


So usually Christmas gifts to family and friends are always food related - cookbooks, kitchen and dining gadgets and home made goods.  


Now talking about Christmas always brings me dinner table thoughts.  You know, menu for the Christmas eve dinner, Christmas breakfast, Christmas lunch, Christmas dinner and every single meal all the way to New Year's day.  It's always exciting to try new dishes in preparation for that special day.  Often times, anticipating the traditional dish becomes the highlight of the meal.


Now this chicken dish can be made any day of the week, a weekend lunch or dinner or try it this holiday season.  The colours do match the holidays too.  This recipe is adapted from  Skinny Taste with the ingredients slightly changed.


Chicken rollatini coated in bread crumbs


Baking in the oven for 25 minutes


Ingredients

500g chicken breast fillets, thinly sliced

125g ricotta cheese

250g baby spinach, washed and roughly chopped


2 cups breadcrumbs

2-3 whole eggs, slightly beaten

125g cream cheese, sliced thinly

125 grated Tasty cheese

700g jar of passata sauce

salt and pepper to taste


Method

Preheat over to 180*C.

Prepare an oven proof rectangular dish.  Spray with canola oil and set aside.

Prepare 3 separate bowl, one with breadcrumbs and one with the beaten eggs.

In a medium sized bowl, combine ricotta cheese and spinach and mix with a fork.

Set aside.

On a large chopping board, work the chicken pieces one by one.  Spread the chicken fillet flat, spread some ricotta-spinach mixture and loosely roll with the seam side down.  Repeat with the remaining chicken pieces.

Coat the chicken rollatini in the beaten egg, then roll into the bread crumbs.  Place in the prepared baking dish.  Repeat with the rest of the chicken pieces.

Lightly spray with olive or canola oil.

Bake in the preheated oven for 25 minutes.

Remove from the oven then pour the passata sauce over the chicken pieces.

Place cream cheese slices on top of the chicken, then the grated cheese.

Bake in the oven for a further 5 minutes or until the cheese has melted.

Serve in individual portions with some salad or roasted vegetables.


After 25 minutes....


Topped with cream cheese and grated Tasty cheese....


Cheese has melted.... seasoned with some more ground pepper
 

And served with some extra explosives on the side! Ha!


Now this has delicious written all over it.  We've made this many times using bocconcini as topping and some mozarella.

Don't you think it looks like Christmas?

Now... time to get some list going.   Thank goodness for online shopping!  Hahaha!


Monday, October 14, 2013

Coq au Verdelho (chicken with mushrooms in white wine sauce)


There will be a trend here for the next couple of weeks.  As I have 2 other chicken dishes to post including this one so it shall be declared that chicken shall be the theme!  

Chicken is the easiest poultry and game meat to cook and prepare.  When we were doing the the Poultry and Game module at TAFE,  working with chicken was my least favourite.  Because no matter how many times we have prepped a whole chicken in class, I still can't get my chicken portoins right when at home.  When in class, I amaze myself.  When at home, it seems like a struggle.  I guess the pressure that there is a chef/teacher breathin down my neck helps in the process of making it right the first time. While at home, who cares how the portions look?!  Hahaha!

Ah memories of Kitchen 10, 8 and Kitchen 1.  And since that's all history now, time to move and get planning.     I've learned so much all those times in the TAFE kitchen but somehow in the process, lost my creativity.  When prior to cooking school I would experiment in the kitchen, during the course I was inclined to be more technical.  You know, following recipes to the very detail and focused more on the technical processes and result rather than having a fun time and just letting ingredients flow.  Thankfully, I've regained it all back - being creative in the kitchen when cooking and baking afterall, is the fun part of it all. 

So what to do after a 2.5 years in a culinary school?  Initially, the goal was just to supplement my knowledge of food and cooking at home, and in blogging.  But then, it has pointed me to a different path and so hopefully a food-related business to materialise soon.


In the meantime and in order to get the ball rolling, I have started lunch box delivery to co-workers and hubby's office.  Not a regular market, but a few tubs of lunch a week gets me busy researching and experimenting on what's best to serve my clientele.  I'm focusing more on Asian cuisine, but once in while serve them familiar dishes and classic favourites.  And this one was raved about most. Served with slices of sour dough bread, it was such a hit they have been asking for the recipe.     

And what luck that I found this on Pinterest!  A Nigel Slater recipe posted on Alida Ryder's blog which will make your family and friends happy to lick their plates clean.  Seriously.


Ingredients

2 tablespoons olive oil

1 large brown onion, finely diced

4-5 pieces rasher bacon, diced

4 garlic cloves, chopped finely

8-9 pieces chicken thighs, on the bone

250 grams button mushrooms, sliced

300 ml Verdelho (or any white wine)

300 ml thickened cream

salt and pepper, to taste

1 bunch flat leaf parsley, coursely chopped


 Method

Season the chicken pieces with salt and pepper and set aside.

Using a large skillet or pan (I used a 30cm large cast iron pan with handles), heat the olive oil.

When oil is hot, brown the chicken pieces in batches.  This will create some caramelisation in the pan.

Once all chicken pieces are browned, set aside on a plate.

Add the onions and bacon to the pan and cook to render fat from the bacon and until the onions are soft.  

Add the garlic and cook for about a minute or until the garlic is fragrant.  Remove the onion-garlic-bacon mixture from the pan and set aside.

 Pour the wine and using a wooden spoon, release some of the caramelisation on the pan.  Let this come to a boil.

Add the chicken pieces into the pan making sure they are spaced out evenly.

Add the onion-garlic-bacon mixture and the mushrooms.

Let this come to a boil, then turn down heat, cover and let it simmer for 15 minutes.

After 15 minutes, add the cream and mix it around the pan using your wooden spoon to evenly distribute the cream into the sauce.  Cook for another 5-10 minutes, or until the sauce has thickened and reduced a little.

Add a handful of chopped parsley and stir to combine the greens into the sauce.

Serve portions topped with more chopped parsley, with rice or slices of sour dough bread.


Tips and tricks:

* I omitted the butter from the original recipe as a personal choice.  Also because I was going to keep the tubs in the fridge for the next day's lunch box, I wanted to avoid the buttery residue on the plastic tubs while the dish is cold.

* I used Lucy's Run Verdelho from my sister's trip to the Hunter Valley a week before and was the white wine I had at home at the time.  Nigel recommends any kind of dry white wine.

* You can use any kind of mushroom.  I actually added more as we love mushrooms at home.

 
Now when I said people will lick their plates clean with this one, I'm not kidding.  So if you make this, make sure you have enough sour dough bread or rice (or even mash) to help them clean their plates.   It's really that good!


Monday, October 07, 2013

Chicken roulade with pistachio butter filling and capsicum rice pilaf

Who doesn't love the internet?!  And social media at that!  Generally, being online and on social media is just about as normal as eating these days.  While not all people have access, a lot of us do, and it quite frankly changing has changed the way we interact and live.  Sans online bullying and inappropriate content, there's a lot of good things to be had with the internet and social media.

Learning has never been so convenient, and information so close, inspiration is there if you start looking and reaching out globally has never been so easy.  And there's another plus.  It's the use of the internet and social media to remind us that yes, despite the negativity happening around us,  there's a lot of reasons to spread good cheer and celebrate humanity, wisdom and kindness.  

I chanced upon this website Wake Up Project through my Facebook page timeline.  A foodie blogger I follow kickstarted her #wakeupproject kindness experiment by paying for an extra burger at lunch and people paid it forward a few seconds after she did.  Amazing!  And so I got on the Kindness Revolution, signed up and received my kindness cards from the post yesterday.  The idea is to think of a kind act, anonymously do your kind act and leave the card.  The card left will tell the recipient of your act and asks them to repeat (or pay it forward) to someone else.  Imagine the ripple effect of something this small.  

As quoted in the Wake Up Project website, "One kind person, multiplied by a 1000s creates a kindness revolution."

While there are lot of people already doing this, volunteers and workers who take time to support a cause, a random act of kindness can create an amazing effect on a person. 

Check out this video from Life Vest Inside titled Kindness Boomerang


Now to food and what's new in ADU.


Well, I've done it!  I have finished my commercial cookery course at TAFE (technically I still need to submit some logbook requirements though, but all good!).  It's such a cliche but time did fly.  And it was a lot of fun!  


And to cap the 2.5 years was of course, a practical test in the kitchen, ala not-so-mystery-box challenge.  Ingredients were given a week before and we were to prepare a 3 course meal.  I'm sharing this simple dish I prepared for my mains.  It's simple because all I really wanted to do on the last day was.... get it all over with! Ha ha!

This recipe is something I just made up but inspired from a Masterchef Au episode. There are 3 main elements in the dish.  The chicken roulade, the rice pilaf and the mushroom sauce.  As I learned in the kitchen, when you're making a dish with several elements, the first thing you do is the sauce.  So here goes.....


To make the mushroom sauce


1 cup button mushrooms, finely chopped

1 onion, finely diced

1/2 cup thicken cream

1 teaspoon of Kikkoman soy sauce

salt and pepper to taste

olive oil


Method

In a pan, heat some olive oil then cook the onions until soft. 

Add the mushrooms and stir to mix for a few seconds.

Add the cream and the soy sauce, and season with salt and pepper.

Let it simmer for about 20 minutes until the sauce has reduced and thickened.  

Set aside.  You can warm this up again when ready to serve.


To make the chicken roulade

Ingredients

2 pieces chicken breast fillet, about 180-200g each

1/2 cup roasted pistachios, coursely chopped

60g  (1/4 cup)  salted butter, softened

1/4 cup sultanas


Method

Slice the chicken length wise so that you have a thin slice of fillet which you can roll.  You can also use a wooden or metal meat tenderiser.  Spread the chicken on top of some cling wrap and cover again with another portion of cling wrap, then pound until you get the desired thickness - about 2-3 cm

In a small bowl, combine the softened butter, sultanas and pistachios and mix together with a wooden spoon until incorporated.

Prepare the one chicken portion onto some fresh cling/plastic wrap.

Spread the pistachio butter filling then roll the chicken gently while tucking in the cling wrap.  You should have a wrapped chicken with filling.

Repeat with the other chicken portion.

In a shallow pan, boil about 1-2 cups chicken stock.  Bring to a boil then reduce heat to a simmer.

Place the wrapped chicken portions in the simmering stock and shallow poach until cooked, about 15-20 minutes.

Let the chicken cool slightly before slicing diagonally and serve on a plate.

Pour the mushroom sauce onto the chicken when serving.


To make the capsicum rice pilaf

Ingredients

1/2 red capsicum, finely diced

1/2 onion, finely diced

375 grams (1 and 1/2 cups) long grain  or basmati rice

1-2 cups chicken stock

olive oil


Method

In a medium sized pot, heat some olive oil then cook the onions until soft.

Add the rice and stir to coat.

Add the capsicum and stir to mix together.

Add the 1 cup chicken stock and reduce heat to medium, cover with a cartouche* and let the rice cook.

Check every once in awhile if the liquid is drying up.  Add the other cup of chicken stock, reduce to simmer and let the rice cook.  

Fluff the rice with a fork and make sure its not sticking to the bottom of the pan.

Serve onto a plate with the chicken roulade.


* Here's a handy tip on how to make a cartouche when cooking.  It's basically a piece of baking paper folded and shaped into a round to cover what you're cooking to avoid forming skin.  I usually use it when poaching fruits and cooking rice stove top.  It's also handy to cut a little piece off the point in the middle so you have a hole for the steam to pass through when poaching or cooking.


So did you check out that Wake Up Project and Life Vest Inside website yet?  I tell you its amazing.  It's inspiring.  And it touches hearts.  I hope to spread some good cheer my way with my kindness cards soon.  But we don't really need a card to do a good deed do we?  Let's spread some kindness around, shall we?


LinkWithin

Related Posts Plugin for WordPress, Blogger...